Everyone talks about testing, but there’s precious little information about what specifically to do. I haven’t seen any nuts–and–bolts descriptions of how to set up a cross-browser, cross-platform testing station.
In this article, I describe how to set up a G3 (or faster) Macintosh to enable you to:
- test your web pages in multiple Windows95 browsers from your Macintosh
- test your web pages in multiple Macintosh browsers without confounding your personal browser’s preferences with those of your testing browsers
- package these elements onto a set of CDs so that if they become corrupted, they can be quickly and easily restored
Obviously there are some hardware requirements involved (starting with a G3 or faster Macintosh). There are also software requirements (most importantly, a copy of RealPC to put a virtual Intel machine into your Mac). All the hardware and software requirements are described in the next section.
The general outline of topics we cover after that is:
- Selecting and downloading the browsers
- Setting up your Mac for Windows95
- Installing and updating RealPC
- Installing Windows95 (and IE 3.02)
- Milestone 1, in which we burn a CD
- Preparing a Windows95 virtual hard disk template
- Milestone 2, in which we prepare virtual hard disks and burn another CD
- Installing Internet Explorer
- Internet Explorer 4.01
- Internet Explorer 5.0
- Internet Explorer 5.5
-
Installing the other browsers
- Lynx 2.8.4p5
- Netscape 3.04
- Netscape 4.08
- Netscape 4.51
- Netscape 4.61
- Netscape 4.78
- Netscape 6.1
- Netscape 6.2
- Opera 5.12
- Opera 6.0
- Cleaning up
- Milestone 3, in which we burn a third CD
- Setting up for Mac browsers, in which we burn a fourth CD
Before you start this project, please understand that all of this takes a while. Depending mostly on the speed of your Internet connection, it might even take a few days to get everything downloaded and installed. The good news is that you’ll only have to do it once, and with these handy instructions, you can be pretty sure of getting it right the first time.
WHAT YOU’LL NEED#section2
The computer I’m using in this article is a Macintosh 7100/66 with a 250MB internal hard drive and a stock CD-ROM drive. It’s been upgraded with a Newer MAXPowr G3/250MHz PDS card, 136MB RAM, an external 4GB SCSI hard drive, an external Yamaha 4x CD-RW unit, and an external Global Village 56K modem. It has a 17” multisync monitor and is running MacOS 8.6.
You’ll need about 2GB of free disk space while the testing station is being set up, and about half that later. You’ll also need two Macintosh volumes that you can install MacOS on. These can be separate physical devices (as they are in this article), partitions on a single physical device, or even read/write removable media. You’ll also need a CD burner with its software and blank CDs, a monitor set to at least 1024 x 768, and a modem and Internet connection.
Since we’ll be installing Windows95, you’ll need a full install of the Windows95 operating system (in this article we’ll be installing from a CD).
We’ll be working with RealPC 1.0.3 with RealPC upgrade 1.0.9 since that’s what I have available.
Requirements summary:
- G3 (or faster) Macintosh
- 96MB RAM
- 2GB free hard drive space
- 200MB bootable volume (separate from the one above)
- CD-R/W unit with CD burning software
- several blank CDs
- monitor that’s at least 1024 x 768
- Internet connection
- RealPC 1.0.3 or higher + upgrade to 1.0.9
- full install of Windows95
SELECTING AND DOWNLOADING BROWSERS#section3
I picked these browsers by selecting what appears to be the last release (for Windows95 and MacOS) of each major version of Internet Explorer and of Netscape’s offerings, both starting with version 3. I’ve added the versions of Lynx that are most recent at the time of this writing (in fact, the ones I’ve chosen are pre-release versions so you may want to select something a little less fresh). I’ve also added Opera starting with version 5 and, for the Mac only, the latest release of iCab. Finally, I’ve included the Macintosh edition of WebTV Viewer (version 2). All together, the testing station described here includes 29 browsers, split about evenly across Windows95 and MacOS.
That’s a lot of browsers. Why so many? Well, you can use this station to help you design for older browsers or for the newer standards-compliant ones. Even if you choose the latter, you may well be interested in how your standards-compliant design degrades in some of the older browsers, so you may find them useful to have around.
Since your needs may be different from mine, you may wish to ignore some of these browsers and/or include others. Perhaps the most important omission is the entire world of Unix browsers. Although I haven’t tried it, it should be possible to use RealPC to install a Unix or Linux virtual PC in your Macintosh if for some reason a PPC version isn’t what you need. If you try it, please let us all know about your experience.
A HANDY CHART#section4
In this chart of browser source tables, I list each browser, the name and size of its download file, and a reference URL for downloading it.
Obviously, the specific filename and file size will probably be different if you’re downloading international editions of the browsers (like, say, the French Netscape 4.78). The reference URLs range from very specific to somewhat general where more general seemed more useful. Please note that these URLs are valid as I write this (January 2002) but through time I’m afraid most of them will stop functioning. That may not be a bad thing if it means that so many newer (and presumably standards-compliant) browsers have been released that no one wants or needs the older ones. To those of you reading this in the future, your best bet for locating older browsers may be some kind of archive similar to the one available today at evolt.org.
Before downloading the browsers, you might find it convenient to set up a series of folders, starting with one for MacOS browsers and one for Windows95 browsers. Here’s the organization scheme I use in this article (each item listed here is a folder):
- mac browsers
- icab
- 2.6
-
ie
- 3.01
- 4.01
- 4.5
- 5.0
- 5.1
-
lynx
- 2.7.1
-
netscape
- 3.04
- 4.08
- 4.51
- 4.61
- 4.78
- 6.1
- 6.2
-
opera
- 5.0
-
webtv
- 2.0
- icab
-
win95 browsers
- ie
- 3.02
- 4.01
- 5.0
- 5.5 service pack 2
-
lynx
- 2.8.4
-
netscape
- 3.04
- 4.08
- 4.51
- 4.61
- 4.78
- 6.1x
- 6.2x
-
opera
- 5.12
- 6.00 release
- ie
Each browser download can be saved directly to its respective folder.
Downloading these can take quite a long time, but hopefully the URLs and specific filenames I’ve provided will at least reduce some of the search time.
Although it’s not an official step in setting up the testing station, after you’ve downloaded the browsers, you might want to burn them to a CD so that you won’t have to repeat the downloading if you accidentally delete any of them.
One last detail: Because of the order we’ll be installing things in this article, there won’t be a zip utility available in Windows when we install Lynx, so expand the zipped Lynx 2.8.4 into its folder now.
SETUP FOR WINDOWS95 BROWSERS#section5
SETTING UP YOUR MAC FOR WINDOWS95#section6
Set your Mac to at least thousands of colors and 1024 x 768. Why not 256 colors? Because we’re setting up Windows for 256 colors. When Windows takes over, the color map used by your Mac will be changed and the non-Windows part of your screen may become painful to look at. With your Mac set to thousands of colors, this doesn’t happen. Why 1024 x 768? Our virtual PC will have an 800 x 600 screen. You can make this smaller (or larger), but 800 x 600 is quite common as I write this.
On your Mac, create a folder called “drives.”.” You can name it whatever you like, but this is the name I’ll use throughout this article. The “drives” folder will be where we put all the virtual hard drives we create for RealPC. The names of the drive files and folder will begin with C, D, or E, corresponding to the C:, D:, and E: drives of DOS/Windows.
Move the “mac browsers” folder into the “drives” folder, then in the “drives” folder, create another called “E shared.” Copy the “win95 browsers” folder into “E shared” so that we’ll be able to access the browser installation packages from inside Windows.
RealPC 1.0.9 adds support for MacOS 9 and Windows98. If you want to install IE 6.0, you’ll have to install Windows98 onto a RealPC virtual hard drive. In this article, we’ll set up four virtual hard drives, but we won’t set up one with Windows98. But after you’ve set up a testing station as described in this article, taking that extra step should not be too difficult.
INSTALLING REALPC#section7
Insert the “RealPC Install CD” that came with your RealPC package and launch the installer. In my case, this installed RealPC 1.0.3. RealPC asks you to set up a virtual hard drive. We’ll be deleting it, so the defaults are fine. Next RealPC will ask you to personalize your copy of the program. Do that, then skip the next section of this article unless you need to update your copy of RealPC.
UPDATING REALPC#section8
Since I had version 1.0.3 of RealPC, I had to download the RealPC 1.0.9 updater. I added it to the RealPC folder. After deleting some things, here’s what we have there:
- HD Expander
- RealPC Guide
- RealPC Hard Disk File C
- RealPC Upgrade Disk
- RealPC_Update109.sea
- RealPC
Launch the RealPC updater. This will create the RealPC_Update109 folder within the RealPC folder. Delete “HD Expander” and “RealPC Upgrade Disk” from the RealPC folder, then copy “HD Expander” and “RealPC Upgrade Disk” from the RealPC_Update109 folder into the RealPC folder.
INSTALLING REALPC (CONTINUED)#section9
From the “Install 3” folder on “RealPC Install CD”, copy HDData to the RealPC folder. Rename “RealPC Upgrade Disk” to “D Win95” and move it to the “drives” folder. Delete everything else from the RealPC folder (including “RealPC Hard Disk File C”) so that it contains only
- RealPC Guide
- HD Expander
- RealPC
- HDData
Set RealPC’s memory allocation to 60MB. You may be able to get by with less, particularly running the early browsers, but for the later all-singing, all-dancing browsers, you’ll find that more RAM is helpful. In fact, even with 60MB, if you don’t have the patience to wait and see what happens after you launch Netscape 6.1, you’d swear this gecko was dead.
Launch RealPC. Since we deleted the virtual hard drive, RealPC gives us the opportunity to create a new one. Create it in the “drives” folder, allocating 200MB for it, and name it “C Win95 256 colors.” We’ll trim back the size of the virtual hard drives later, but the browsers require more disk space during installation.
Screenshots: [019] [020] In the Setup menu, adjust RealPC’s display and memory settings. Warning: After this and until you’ve made a backup, don’t mess with the display setting or with Windows95’s Display control panel. You may end up with a permanently corrupted color map in Windows (and you’ll have to repeat all your installations). After you’ve completed all your installations and burned everything to CD, then go ahead and experiment.
Restart the PC (not the Mac). RealPC will ask you where “RealPC Upgrade Disk” is. Select “D Win95.” In the Setup menu, select RealPC Setup then set shared drive E: to the “E shared” folder in the “drives” folder.
And that’s it for the first part of the setup. Next we’ll install Windows95.
INSTALLING WINDOWS95#section10
Insert your Windows95 installation CD into the internal CD drive on your Mac. After it appears on your Mac desktop, at the DOS prompt in the RealPC window, type
f:setup
If RealPC has trouble finding your CD and you have more than one CD drive attached, try using another drive. If all else fails, try adjusting the settings in RealPC’s Setup menu (see your RealPC manual for hints).
Assuming that your CD was recognized, press the return key when Windows95 Setup announces that it will perform a routine check on your system. Assuming (again) that it found no errors, press the “x” key to continue.
Eventually, a dialog box will appear. Press Command-M to activate the Windows mouse, then click Continue.
After a while, the Windows95 Software License Agreement will appear. Click “Yes” if you agree to it.
The Windows95 Setup Wizard will start. Click “Next.” Accept the default Windows95 location of C:WINDOWS then click “Next.” Select Typical install then click “Next.” Enter your Windows95 access code then click “Next.”
Provide the Setup Wizard with a name, then click “Next.” In the Analyzing Your Computer dialog, check the checkbox then click “Next.” In the Windows Components dialog, select the first radio button (“Install the most common components”) then click “Next.” In the Startup Disk dialog, select “No, I do not want a startup disk”, then click “Next.” In the Start Copying Files dialog, click “Next.”
Go get some coffee and come back in about 15 minutes. Alakef Coffee Roasters, right here in Duluth makes a very nice Kenya, and Dunn Brothers, down in the Twin Cities has a delightful organic Mexico. And the Positively Third Street Bakery co-op, a three minute walk from here, makes killer Mocha Madness chocolate chip cookies—definitely worth a visit if you’re in town.
After Windows has copied the files it needs, the Finishing Setup dialog will appear. Click “Finish.” Your PC (not your Mac) will reboot and RealPC will then ask you again to locate the “RealPC Update Disk.” Select “D Win95” in the “drives” folder. Windows then will begin its actual setup.
After a few minutes, Windows will ask you to select your time zone in the Date/Time Properties control panel. Make an appropriate selection then continue by clicking “Close.”
Windows will next ask you to set up your printer. Start by clicking “Next” and click “Next” for each window until you’re prompted for the name of your printer. Type it into the textbox then click “Next.” Finally, select the “No” radio button when you’re asked whether you’d like to print a test page then click “Finish.”
Windows will ask you to click OK to restart your computer. Click “OK.” Your PC will restart again and Windows will spend a few minutes configuring itself. Eventually, a “Welcome to Windows95” dialog will appear. Click Close. Windows will restart again.
Log in to Windows, but don’t set any passwords. I have a theory that if Windows thinks I’m Bill, it will try extra hard to be nice to me, so that’s how I log in. Again, a Welcome to Windows95 dialog will appear. Uncheck the “Show this Welcome screen” checkbox in the bottom left corner and click “Close.”
From the Windows Start menu, in the bottom left corner of the Windows desktop, select Shutdown.
Congratulations, Windows 95 is installed in your virtual PC and we’ve reached Milestone 1.
MILESTONE 1#section11
Burn a copy of your “D Win95” and “C Win95 256 colors” files onto a CD. Now, if anything becomes corrupted in Windows, you can start again at this point without having to re-install Windows: simply copy the “D Win95” and “C Win95 256 colors” files from the CD you just burned to the “drives” folder on your hard drive, replacing the versions that are there.
PREPARING THE WINDOWS95 TEMPLATE#section12
Double-click the “C Win95 256 colors” icon to launch Windows again. In the Windows desktop, delete “Online Services” and “Set Up The Microsoft Network.”
Screenshot: [052] In “My Computer/Realpc (C:)/Program Files”, delete “NetMeeting”, “Online Services”, “The Microsoft Network”, and “Windows Messaging.”
In “My Computer/Realpc (C:)/Windows/Start Menu/Programs”, delete “Microsoft NetMeeting”, “Online Services”, “Internet Mail”, and “Internet News.”
In “My Computer/Realpc (C:)” select File > New > Folder to create a new folder. Name it “documents.”
Screenshot: [062] In the “My Computer” window, open your “E shared” drive then select View > Options.
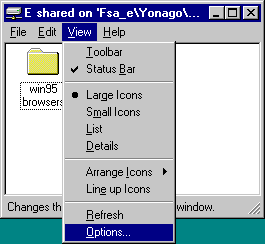
In the Options dialog, select the View panel, then uncheck the bottom checkbox that says “Hide MS-DOS file extensions.” Click “OK.” Drag the file “blank.html” from “E shared” to the “documents” folder. Since we just unchecked the “Hide MS-DOS file extensions” checkbox, the “.html” extension should be visible. Close all the Windows windows.
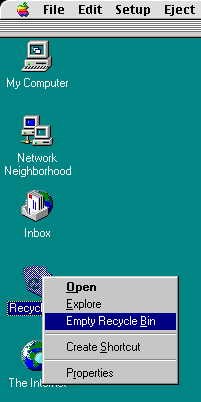
Screenshot: [065] Now, empty the recycle bin. Do this by clicking on it, then when it’s selected, press Command-R (this is the mouse-right-button equivalent in RealPC). Select “Empty recycle bin” from the pop-up menu.
Find out how much free space you have on “C Win95 256 colors” (your virtual C: drive) by double-clicking on the “My Computer” icon on the Windows desktop, then single-clicking on the “Realpc (C:)” icon in the “My Computer” window. Press Command-R to see the pop-up menu and click Properties. Windows will show you how much of the hard disk is used and how much is free.
Screenshot: [066] Notice the numbers on the right (74.9MB and 124MB). When we resize hard disks later, these are the values we’ll need to determine how small we can make the hard drives. I’ll come back to this later.
Click “Cancel” then close the “My Computer” window, and shutdown the PC. We’ve now made it to Milestone 2.
MILESTONE 2#section13
Again, burn the two hard drive files (“D Win95” and “C Win95 256 colors”) to a CD (these should fit on your first CD). The latest version of the “C Win95 256 colors” file will be a kind of template that we’ll copy several times and install various browsers on.
So, make three copies of the “C Win95 256 colors” file and name them
- C Win95 256 colors IE 4.01
- C Win95 256 colors IE 5.0
- C Win95 256 colors IE 5.5s2
Rename the original to:
- C Win95 256 colors others
Now, the “drives” folder should have six items (the four just mentioned, “mac browsers”, and “E shared”, which itself contains the two items “blank.html” and the “win95 browsers” folder).
Since in Windows each installation of Internet Explorer replaces the previous version, we’ll use a separate virtual hard drive for each version except version 3.02 which was installed automatically with Windows95. We’ll leave 3.02 on the “C Win95 256 colors other” disk and install the other, non-Microsoft browsers there with it. Internet Explorer 4.01, 5.0, and 5.5s2 will go onto the three other hard drives we prepared above.
INSTALLING INTERNET EXPLORER#section14
Log onto your ISP with your Mac. Some of the installations require a live connection, and if you’re not logged in before you launch RealPC, your computer may freeze.
Although some of the details are different, here’s a summary of what we’ll do with each version of Internet Explorer we install:
- Make sure you’re logged on to the Internet.
- Install the browser.
- Set options (turn off caching and automatic updates, set our own start page).
- Resize the browser window.
- Quit the browser, then restart it to make sure the option settings have been recognized and the browser remembers your preferred window size.
- Setup shortcuts to the browser on the Windows desktop and in C:WindowsStart MenuProgram FilesStartUp so that it launches automatically.
- Check how much of the space on the virtual hard disk is used then use shrink it with RealPC’s HD Expander.
INTERNET EXPLORER 4.01#section15
Launch RealPC by double-clicking the “C Win95 256 colors IE 4.01” icon in the “drives” folder.
Screenshot: [072] In Windows, navigate to “E sharedwin95 browsersie5.0ie4install.exe.” Double-click it. After it decompresses itself, the Setup dialog will appear. Click “Next.” When the license agreement appears, select “I accept the agreement” then click “Next.” Make sure that “C:Program FilesInternet Explorer” appears in the Destination Folder window, then click “Next.”
A short while later, IE Setup will tell you to disconnect. Don’t. Just click “OK.” Setup will then spend a few minutes configuring your system. You’ll then get a message that says “Setup must restart your computer.” Click “OK.” Your PC will restart.
Sit back for a few minutes as IE Setup initializes some things. Soon the Setup message window will go away and for a while only a green desktop will be visible. Eventually the desktop icons will appear with another setup message, then an IE Welcome window and a channels window will appear. Close both. You’ll be asked “Do you want the Channel Bar to be displayed next time you restart your computer?” Click “No” then restart your PC (not your Mac).
Uncheck the “Show this next time” checkbox at the bottom of the IE Welcome window then close the window. Rename the IE alias on the desktop from “Internet Explorer” to “Internet Explorer 4.01.”
Screenshot: [084] In “My ComputerRealpc (C:)Program FilesInternet Explorer” make an alias of “Iexplore.exe.” To do this single-click “Iexplore.exe.” While it’s highlighted, press Command-R to get the Windows popup menu. In the popup menu select “Create Shortcut.” Drag this alias to “My ComputerRealpc (C:)WindowsStart MenuProgramsStartUp”, then close all the windows and launch IE.
When it launches, IE will try to contact microsoft.com where it will encounter a script error. You will be asked “Do you want to continue running scripts on this page?” Click “No.” In IE’s address bar type C:documentsblank.html then press return.
Screenshot: [090] In IE’s View menu, select Internet Options, then in the Internet Options window, under “Home Page” in the General tab, click “Use Current.” Under “Temporary Internet files”, click “Settings.” In the Settings window select the top radio button “Every visit to the page” and drag the “Amount of disk space to use” slider all the way to the left then click “OK.” Back at the original Internet Options window, click “OK”, then quit IE.
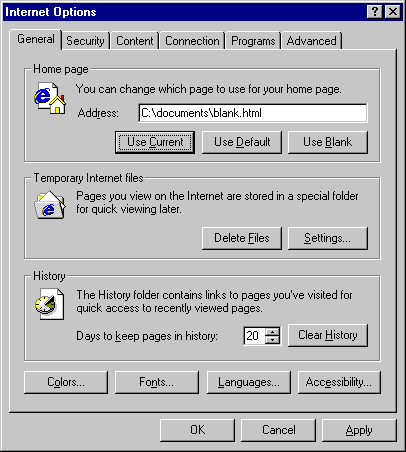
Relaunch IE to check that the startup page is “blank.html” then quit IE again.
Get the amount of used space on the C: drive. On my machine, it shows that 108MB are used. So we’ll soon resize this drive to a little more than that (to 110MB). Close all the windows, then restart your PC to make sure that IE launches automatically. Then quit IE and shutdown your PC.
Duplicate “C Win95 256 colors IE 4.01” in case anything goes wrong during resizing. In the RealPC folder, launch “HD Expander.” Navigate to “C Win95 256 colors IE 4.01” then click “Open.” Set the New Size to 110MB then click “Shrink.” “HD Expander” will defragment the drive and copy the contents to a new, smaller file. When it finishes, quit “HD Expander.”
Launch Windows95 and IE 4.01 by double-clicking “C Win95 256 colors IE 4.01.” If all goes well, shutdown Windows then delete “C Win95 256 colors IE 4.01 copy.”
That’s it! You’re done installing the first browser.
INTERNET EXPLORER 5.0#section16
Make sure you’re connected to the Internet before you launch RealPC, then double-click “C Win95 256 colors IE 5.0” in the “drive” folder.
In Windows, navigate to “E sharedwin95 browsersie5.0ie5setup.exe.” Double-click it. In the Windows Update window, select the top radio button (“I accept the agreement”) then click “Next.”
After a few moments, a window will appear asking which type of install to do. Select the top radio button “Install Now – Typical set of components”, then click “Next.” In the Download Sites window select whatever is appropriate for your location then click “Next.” Go for another cup o’ joe and come back 19 megs later, when the download is complete.
When the download is done, a window saying “Restart Computer” will appear. When you click “Finish” your PC will restart.
The Windows Update message will appear and Windows will spend a few minutes performing updates, then personalizing settings for IE 5. When it’s done, delete “Connect to the Internet” and “Outlook Express” from the Windows desktop. From “My ComputerRealpc (C:)”, delete the “Windows Update Setup Files” folder. From “My ComputerRealpc (C:)Program Files”, delete the “Outlook Express” folder.
Navigate to “My ComputerRealpc (C:)Program FilesInternet Explorer” and make an alias of “Iexplore.exe”, then drag it to the Windows desktop. Close the “Internet Explorer” and “Program Files” windows, then open “My ComputerRealpc (C:)WindowsStart MenuPrograms.” Drag the alias into the “StartUp” folder there.
Rename “My ComputerRealpc (C:)WindowsStart MenuProgramsInternet Explorer” to “Internet Explorer 5.0.” Delete the “Outlook Express” shortcut from there then close all the windows.
On the Windows desktop, rename “Internet Explorer” to “Internet Explorer 5.0” then launch IE. The Internet Connection Wizard will start up. Click “Cancel”, then in the next dialog, check the checkbox (“Do not show the Internet Connection wizard in the future”), then click “Yes.”
Screenshot: [115] After IE starts up, resize the browser window, then open “C:documentsblank.html.” From IE’s Tools menu select Internet Options. In the “Home Page” section of the “General” tab click “Use Current.” In the “Temporary Internet Files” section, click “Settings”, then in the Settings window, select the first radio button “Every visit to the page”, and slide the “Amount of disk space to use” slider all the way to the left. Click “OK.” In the “Advanced” tab, uncheck “Automatically check for Internet Explorer updates”, “Disable script debugging”, and “Enable Install On Demand”, then click “OK.”
Quit IE, then restart Windows to check that IE loads up automatically and that your window position and start page have been remembered.
Quit IE again then empty the “Recycle Bin.”
Check the amount of disk space used. In my case, 121MB of the virtual C: drive is full, so in just a minute we’ll resize it to 125MB. Close all the Windows windows, then shut down your PC. Duplicate “C Win95 256 colors IE 5.0” in case anything goes wrong during resizing. Use “HD Expander” to resize the original “C Win95 256 colors IE 5.0” to 125MB.
Launch Windows95 and IE 5.0 by double-clicking “C Win95 256 colors IE 5.0.” If all goes well, shutdown Windows then delete “C Win95 256 colors IE 5.0 copy.”
Two down, one to go. Next we’ll install IE 5.5.
INTERNET EXPLORER 5.5#section17
Installing IE 5.5 is practically identical to installing version 5.0. Other than using the IE 5.5 installer and “C Win95 256 colors IE 5.5s2”, and renaming the desktop icon with “5.5” instead of “5.0”, the only difference is that the virtual C: drive is resized to 130MB instead of 125MB.
Once you’ve installed IE 5.5 that’s it for Internet Explorer. But if you want to add a virtual hard drive with IE 6, you’ll need to install a copy of Windows98 there. We won’t do that in this article, but don’t let that stop you!
INSTALLING THE OTHER BROWSERS#section18
First, we’ll have to expand our virtual hard drive “C Win95 256 colors others” to 500MB.
As always, make sure you’re connected to the Internet before you launch RealPC, then double-click “C Win95 256 colors others” in the “drive” folder.
In Windows, navigate to “My ComputerRealpc (C:)Program Files” and under the File menu, select New > Folder. Name the new folder “browsers.”
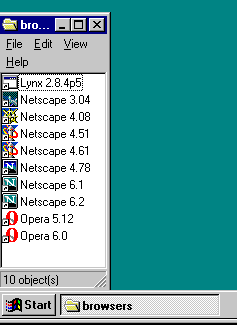
Within the “browsers” folder, create ten new folders named:
- Lynx 2.8.4p5
- Netscape 3.04
- Netscape 4.08
- Netscape 4.51
- Netscape 4.61
- Netscape 4.78
- Netscape 6.1
- Netscape 6.2
- Opera 5.12
- Opera 6.0
Create one more folder and name it “browsers.” Drag this folder onto the Windows desktop then close all the windows. This new “browsers” folder is where we’ll keep aliases to each browser we install. You could keep these aliases in your Start menu if you like, giving you a slightly cleaner desktop, but I like being able to see at a glance (without clicking the Start menu) what browsers are installed.
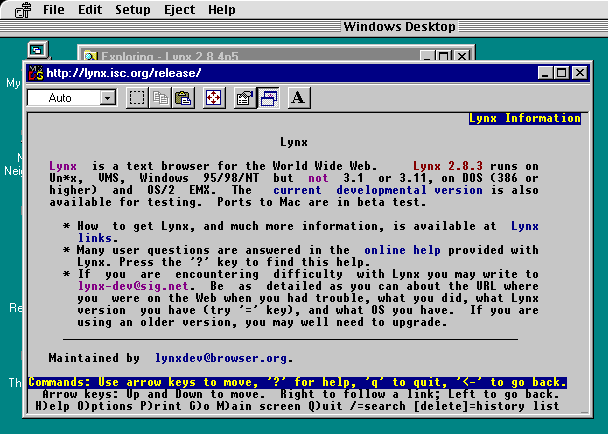
LYNX 2.8.4#section19
In Windows, navigate to “E sharedwin95 browserslynx2.8.4.” Copy the contents of that folder into “Realpc (C:)Program FilesbrowsersLynx 2.8.4p5.”
In the “Realpc (C:)Program FilesbrowsersLynx 2.8.4p5” folder, make an alias of “lynx.exe” and rename it “Lynx 2.8.4p5.” Drag it into the desktop “browsers” folder.
Screenshot: [126] Launch Lynx to make sure it works then quit by typing “q” in the Lynx window. Type “y” when Lynx asks “Are you sure you want to quit?”.
NETSCAPE 3.04#section20
In Windows, navigate to “E sharedwin95 browsersnetscape3.04n32e304.exe.” Double-click it.
A dialog box will appear. Click “Yes” to confirm that you want to install Navigator Version 3.04. In the Welcome window that appears, click “Next.” In the Choose Destination Location window, click the “Browse” button and navigate to “My ComputerRealpc (C:)Program FilesbrowsersNetscape 3.04.” Click “OK” in the Choose Directory window, then click “Next” in the Choose Destination Location window.
After a few moments, a Question window will appear asking if you would like to connect to Netscape to configure Navigator. Click “No.” In the next Question dialog, click “No” to avoid reading the readme file. Finally, when the “Setup is complete” dialog appears, click “OK.”
In the Netscape License Agreement window, click “Accept.” Netscape will then launch. It may not be able to find a bookmark file. If that happens, a dialog box telling you so will appear. Click “OK.”
Relocate and resize the browser window.
In Netscape’s Options menu, select General Preferences. Under the Appearance tab, in the Startup section, in the “Browser Starts With” textbox type C:documentsblank.html then click “OK.”
In Netscape’s Options menu, select Network Preferences. Under the Cache tab, type 0 (zero) into the Disk Cache textbox, and click the “Every Time” radio button in the Verify Documents item. Click “Clear Disk Cache Now.”
Confirm that you want to clear the disk cache by clicking “OK”, then back in the Preferences window, click “OK.”
Quit Netscape then re-launch it to make sure it remembered your preferred window size and location, and your start page. Quit Netscape again.
Rename the “Netscape Navigator” icon on the Windows desktop to “Netscape 3.04” and drag it into the desktop “browsers” folder.
NETSCAPE 4.08#section21
In Windows, navigate to “E sharedwin95 browsersnetscape4.08n32e408.exe.” Double-click it.
In the Welcome window that appears, click “Next.” When the Software License Agreement window appears, click “Yes.” In the Setup Type window, click “Browse” then navigate to “C:Program FilesbrowsersNetscape 4.08.” Click “OK” in the Choose Directory window, then “Next” in the Setup Type window.
An Information dialog box mentioning the previous installations of Navigator will appear. Click “OK.” In the Select Program Folder window, click “Next.” In the Start Copying Files window, click “Install.”
After the installation, a dialog will appear asking if you want to read the readme file. Click “No.” Click “OK” in the “Setup is complete” dialog.
Launch Netscape, then in the New Profile Window, click “Next.” Click “Next” twice more (until you get to a window with three radio buttons). Select the second radio button “Copy my existing user files”, then click “Finish.”
Screenshot: [151] Relocate and resize your browser window.
Under the Edit menu, choose Preferences. In the Navigator section of the Preferences window, select the “Home page” radio button under “Navigator starts with”, then click “OK.” (The cache preferences should be retained from the Netscape 3.04 settings, but you can check this if you wish.)
Quit Netscape then re-launch it to make sure it remembered your preferred window size and location, and your start page. In my installation, the browser window will not stay quite as tall as I would like, but it will do. Quit Netscape again.
Rename the “Netscape Navigator” icon on the Windows desktop to “Netscape 4.08” and drag it into the desktop “browsers” folder.
NETSCAPE 4.51#section22
Installing Netscape 4.51 is very similar to the installing version 4.08. Start by launching “E sharedwin95 browsersnetscape4.51cc32e451.exe.” But after the Information dialog box mentioning the previous installations of Navigator, a Netscape Desktop Preference Options window will appear. Uncheck all three boxes (“default browser”, “home page”, “search the Web”) then click “Next.”
The installation then proceeds just as Netscape 4.08 did except that at the end, after the “Setup is complete” dialog box, you’re given the option of restarting Windows. Select the top radio button (“Yes, I want to restart my computer now”) then click “OK.”
After the restart, launch Netscape. Close the Communicator floating palette then resize your browser window.
Under the Edit menu, choose Preferences.
Screenshot: [160] Expand the Advanced category in the Preferences window, then select the SmartUpdate item. In the SmartUpdate section of the window, uncheck the “Enable SmartUpdate” checkbox, then click “OK.” (The start page and cache preferences should be retained from the Netscape 4.08 settings, but you can check this if you wish.)
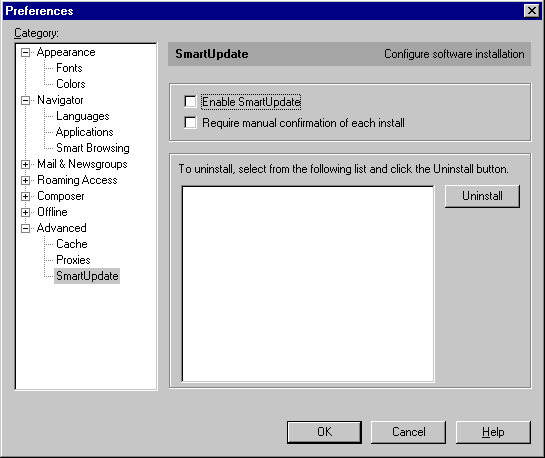
Quit Netscape then re-launch it to make sure it remembered your preferred window size and location, and your start page. In Netscape 4.51, the browser window does remember my preferred window size (unlike in 4.08; see above). Quit Netscape again.
Rename the “Netscape Communicator” icon on the Windows desktop to “Netscape 4.51” and drag it into the desktop “browsers” folder.
NETSCAPE 4.61#section23
Again, this installation is very similar to the last. Start by launching “E sharedwin95 browsersnetscape4.61cc32e461.exe.” Everything proceeds as above, except that after the Start Copying Files window, a message about an old version of RealPlayer being uninstalled will appear. A newer one will be installed, then installation again proceeds as above.
After restarting, launch Netscape. A notice relating to RealPlayer will appear but then be covered up by Netscape. We’ll see it later.
Netscape will be unable to find home.netscape.com and you’ll get a message to that effect. Click “OK” then quit Netscape. That notice about RealPlayer’s color preferences will now be visible. Click “OK.”
Launch Netscape again. This time it will open with our “blank.html” file. All our other preferences should also be retained from our previous installations of Netscape, but you can check this if you like. Quit Netscape again.
Rename the “Netscape Communicator” icon on the Windows desktop to “Netscape 4.61” and drag it into the desktop “browsers” folder.
NETSCAPE 4.78#section24
Yet again, this installation is similar to the last. Start by launching “E sharedwin95 browsersnetscape4.78cc32d478.exe.” After this, the only significant difference with respect to the Netscape 4.61 installation is that the RealPlayer installation isn’t repeated, so nothing related to that (including the restart option) happens in this installation.
As usual, you may wish to launch Netscape to check that our preferences were carried over from previous installations, and that our window location and size preferences have been remembered.
Rename the “Netscape Communicator” icon on the Windows desktop to “Netscape 4.78” and drag it into the desktop “browsers” folder.
NETSCAPE 6.1#section25
In Windows, navigate to “E sharedwin95 browsersnetscape6.1xN6SetupB.exe.” Double-click it.
In the Netscape 6 (6.1) Setup – Welcome window that appears, click “Next.” When the Software License Agreement window appears, click “Accept.” In the Setup Type window, click “Browse” then navigate to “C:Program FilesbrowsersNetscape 6.1.” Click “OK” in the “Select a directory” window, then “Next” in the Setup Type window. (Leave the “Recommended” setup radio button selected.) In the Start Install window, click “Install.” Several windows will then come and go.
Launch Netscape. After a long time (on my machine), a Windows Integration dialog will appear asking about making Netscape 6.1 the default application to use for related documents. Click “No.” An Activation window will appear. Click “Cancel.” In the Confirm dialog, click “Cancel.”
Relocate and resize the browser window.
Screenshot: [174] Under the Edit menu, select Preferences. In the Category section of the Preferences window, expand “Privacy and Security” then select the “Forms” item. In the Forms section of the window, uncheck the “Save form data” checkbox.
In the Category section of the Preferences window, expand “Advanced” then select the “Software Installati…” item. In the Software Installation section of the window, uncheck the “Enable software installation” checkbox. Click “OK” then quit Netscape.
Launch Netscape again. This time it should open with our “blank.html” file. Quit Netscape again.
Rename the “Netscape 6” icon on the Windows desktop to “Netscape 6.1” and drag it into the desktop “browsers” folder.
NETSCAPE 6.2#section26
This installation is similar to the one for Netscape 6.1. Start by launching “E sharedwin95 browsersnetscape6.2xN6SetupB.exe.” Proceed as above, but when the Quick Launch window appears, click “Next.” Then, in the Start Install window, click “Install.” After installation Netscape should launch automatically.
Under the Edit menu, select Preferences. In the Category section of the Preferences window, expand “Advanced” then select the “Cache” item. Type a 0 (zero) in the Disk Cache textbox. Click “OK” then quit Netscape.
Launch Netscape again. This time it should open with our “blank.html” file. Quit Netscape again then drag the “Netscape 6.2” icon from the Windows desktop into the desktop “browsers” folder.
OPERA 5.12#section27
In Windows, navigate to “E sharedwin95 browsersopera5.12ow32enen512.exe.” Double-click it.
In the Opera 5 (Win32) Installation window, click “Next.” In the Software License Agreement window, click “I Accept.” In the Select Destination Directory window, click “Browse” then in the Select Destination Directory window navigate to “C:Program FilesbrowsersOpera 5.12.” Click “OK.” A dialog box will appear asking you to confirm that installation location. Click “Yes.” Back in the Select Destination Directory window, click “Next.”
In the Icon Creation window, click the “Next” button. (We’ll delete the icon from the Start Menu later along with a bunch of others, but we’ll use the desktop icon.)
In the Select Group window, click “Next.” In the Ready to Install! window, click “Next” to begin the installation.
After the installation, in the Installation Completed! window, click “Finish.” Opera will launch.
Screenshot: [189] In Opera’s File menu, select Preferences. From the list on the left side of the window, select “History and cache.” In the “Disk cache” area on the right side of the window, type 0 (zero) in the KB textbox, uncheck the first three checkboxes (“Cache documents”, “Cache images”, “Cache other”) and check the fourth (“Empty on exit”). You may as well click the “Empty now” button too. In the “Check modified” section in the bottom half of the window, select the “Always” radio buttons under “Documents”, “Images”, and “Other.” In the “RAM cache” section near the middle of the window, uncheck the “Enable automatic RAM cache” checkbox, and then uncheck the other checkboxes in that section as well (“Cache documents”, “Cache images”, “Cache rendered images”).
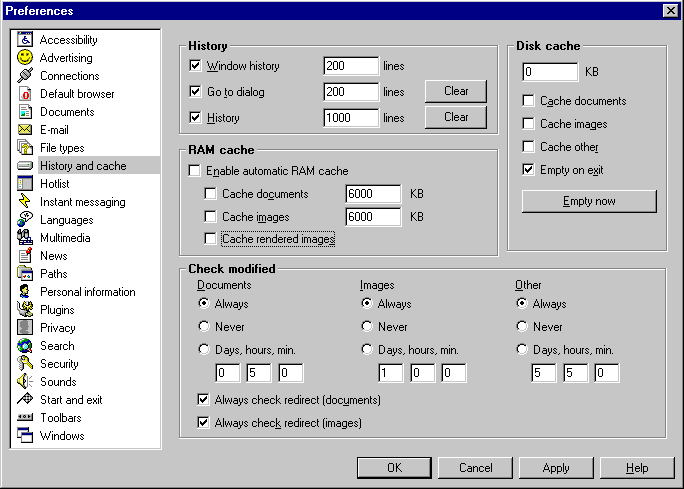
From the list on the left side of the window, select “Plugins.” In the “JavaScript” section at the bottom of the right side of the window, check the “Report JavaScript errors” checkbox, then click “OK.”
After a moment, a warning dialog related to email clients may appear. Click “Yes” to continue applying the new preferences.
In Opera’s Navigation menu, select “Set home page.” In the “Global home page” textbox in the “Set home page” dialog, type C:documentsblank.html then click OK.
You could relocate and resize the browser window, but in my experience Opera will maximize its application window the next time it starts up. Quit Opera.
After you relaunch Opera, a dialog box will appear asking whether Opera should be made the default browser. Check the “Do not show this dialog again” checkbox, then click “No.” The “Tip of the day” dialog will appear. Uncheck the “Show tips at startup” checkbox at the bottom of the dialog box, then click “Close.” Quit Opera again.
Rename the “Opera 5” icon on the Windows desktop to “Opera 5.12” and drag it into the desktop “browsers” folder.
OPERA 6.0#section28
The actual installation of Opera 6.0 is practically identical to that of Opera 5.12. Start by launching “E sharedwin95 browsersopera6.00 releaseow32enen600.exe.” Proceed as above until the installation is complete and Opera launches.
A welcome dialog will give you the option of selecting “Windows on desktop.” Click that item, then check the “Do not ask me again” checkbox at the bottom of the window. Click “Start.”
Screenshot: [200] In this version of Opera, your preferred location and size for the browser window will be remembered, so go ahead and relocate and resize it.
In the browser’s address bar, type C:documentsblank.html then press return. Opera will change the URL to file://localhost/c:/documents/blank.html. In Opera’s File menu, select Preferences. From the list on the left side of the window, select “Start and exit.” In the “Start” area on the right side of the window, click the “Use active” button.
Since Opera doesn’t import preferences from earlier versions of itself, we’ll have to set them all again for this version. From the list on the left side of the Preferences window, select “Multimedia.” In the “JavaScript” section at the bottom of the right side of the window, check the “Report JavaScript errors” checkbox.
From the list on the left side of the window, select “Default browser.” Uncheck the “Check if Opera is default browser” checkbox at the bottom of the window.
From the list on the left side of the window, select “History and cache.” In the “Disk cache” area on the right side of the window, type 0 (zero) in the KB textbox, uncheck the first three checkboxes (“Cache documents”, “Cache images”, “Cache other”) and check the fourth (“Empty on exit”). You may as well click the “Empty now” button too. In the “Check modified” section in the bottom half of the window, select the “Always” radio buttons under “Documents”, “Images”, and “Other.” In the “RAM cache” section near the middle of the window, uncheck the “Enable automatic RAM cache” checkbox, and then uncheck the other checkboxes in that section (“Cache documents” and “Cache images”). Click “OK” then quit Opera.
Re-launch Opera. The “Tip of the day” dialog will appear. Uncheck the “Show tips at startup” checkbox at the bottom of the dialog box, then click “Close.” Quit Opera again.
Rename the “Opera” icon on the Windows desktop to “Opera 6.0” and drag it into the desktop “browsers” folder.
CLEANING UP#section29
In the Windows desktop, select the AOL 700 hours icon, the AOL Instant Messenger icon, the RealPlayer Basic icon, and the Take5 icon. Drag them all to the Recycle Bin.
Navigate to “My ComputerRealpc (C:)WindowsStart Menu.” Select the Free AOL icon, then press Command-R. In the popup menu, select “Delete” then confirm the deletion by clicking “Yes” in the confirmation dialog. Do the same thing with the Netscape SmartUpdate icon.
In the Start Menu folder open the Programs folder then delete everything except “Accessories”, “StartUp”, “MS-DOS Prompt”, and “Windows Explorer.”
Empty the Recycle Bin.
Screenshot: [209] Open the desktop “browsers” folder and in the View menu, select List. Then resize and relocate the “browsers” window to just above the Start Menu.
Check to see how much space is used on the virtual hard drive. In my case, 247MB is used, so in just a minute I’ll resize “C Win95 256 colors other” to 250MB.
Shutdown your PC, then duplicate the “C Win95 256 colors other” hard drive file. After making a backup, resize it using HD Expander. Launch it to make sure it works before deleting the backup.
MILESTONE 3#section30
Finally, burn the four virtual hard disks in the “drives” folder onto a CD. They should all fit onto one 700MB blank without any difficulty.
SETUP FOR MAC BROWSERS#section31
Setting up the Mac browsers is much easier.
I wanted to keep my personal browsing preferences separate from my testing browsers: I prefer a lean browser but I wanted the test ones to have all their chrome and default preferences intact. To do that, I dedicated my Mac’s old internal 250MB hard drive to testing. It has a full install of MacOS 8.6 and some utilities on it but little else. If you don’t have a second physical hard drive, you might consider creating a new partition on the hard drive you do have, or using a removable bootable read/write medium.
On the second volume do a clean OS install, then reboot from that volume. You may find it useful to reset the desktop color to one very different from the one you use on your main hard drive (in my case, one is bluish, the other yellowish). Next, install and launch each Macintosh browser in sequence. As with the Windows95 browsers, turn off caching and automatic software updates, turn on JavaScript error reporting, and set the default open page to a blank HTML document.
Why not just select “start with blank page” when it’s available? Simply for this: by replacing the “blank.html” file with an alias to whatever I’m working on (while retaining the “blank.html” filename), in some circumstances all I have to do to see how the page looks is launch a browser and the page loads up automatically. You could do something similar using symbolic links on a Unix web server and have the full web server functionality available if your pages are CGI intensive (or otherwise dynamic, like being generated with PHP or ASP).
Having installed the MacOS and set the preferences of all your Mac browsers, you might want to burn the system folder with those preferences to a CD. That way you can easily restore all defaults and clean out unwanted extensions and preference files that may accumulate there. But when you do that, if you include the “mac browsers” folder that contains all the expanded browsers, you’ll have your main Macintosh testing materials all on one CD.
If, like me, your second volume is rather small, you may not be able to store the Macintosh browsers there. Instead, I keep the Macintosh browsers on the 4GB hard drive even though when I use them I’m booting from the smaller volume. In any case, make an alias of each browser and put them all in a single folder for convenient access.
When you want to test, boot from the second volume, and all of the browsers will have their default settings. When you’re done, boot from the first and your personal settings for your favorite browser will be available.
One last detail that’s useful for testing page designs without resizing your screen is the Small Screen program by Daniel Schaerer. It’s free and small, and sometimes quite useful: on your monitor it will draw the outline of one or more other screen sizes. By placing your browser in the upper left corner of your screen, you can easily see how much of your page design is available (without scrolling) to folks with displays smaller than yours.
CONCLUSION#section32
Yes, it works.
Yes, it can be slow, particularly with Netscape 6.x in Windows95, but generally the performance isn’t bad.
Yes, it takes a long time to set up but once everything is burned to CD, restoring parts of the setup is as simple as copying the relevant items from the CD.
There are other bells and whistles that can be added to the testing station including other browsers and other x86 operating systems that could run under RealPC. One other potential enhancement that goes way beyond the scope of this article is using AppleScript to automate your testing (of scriptable browsers at least).
So, developers who use Macs and who can meet the modest hardware and software requirements described here can now thoroughly test their work without the hassle of leaving their offices. (For some that might not necessarily be a good thing, but that too is beyond the scope of this article.)
terrific overall point, but so very, very, very out of date. Time to update. If anyone runs across this, I do the same thing, but with Virtual PC 6 on a WindTunnel (those are, uh, /speed holes/). I develop in Safari, immediately test in IE5-mac, also look in Firebird and Mozilla when I get around to it. Then I fire up VPC where I have VMs=three test environments (and a 4th for a VPN to get to the company network). I use Win98 for IE 5.0.not-a-damn-thing and 5.5SP2 (enough differences to matter, in my recent experience), and IE6 on XP. With standards and all the mac browsers I am not gonna be suprised by anything else.
THis is more of a question than a comment to this thread.
I am trying to work out why a website that functions perfectly on a PC browser brings up an error problem on my Macintosh browser. I am trying to make a website that has been developed in ASP Mac friendly and everything works until it comes to the ordering mechanism on a page.
The site is http://www.amazingflygun.com. In testing, I select a country fom which the supposed order will come from, from a drop down list. I key in the amount of the product that I require and I get this error: Microsoft JScript runtime error Object expected
and the website then brings up this: An Error Occurred:
No Country Information Found. This does not occur on a PC browser.
Any ideas??